使用net-byte/vtun搭建VPN服务
版权声明 本站原创文章 由 萌叔 发表
转载请注明 萌叔 | https://vearne.cc
1.前言
萌叔发现了一个新库net-byte/vtun vtun可以用来快速部署VPN服务,代码粗略看了下,原理非常简单,就是利用隧道技术来实现的。
2.隧道技术原理图
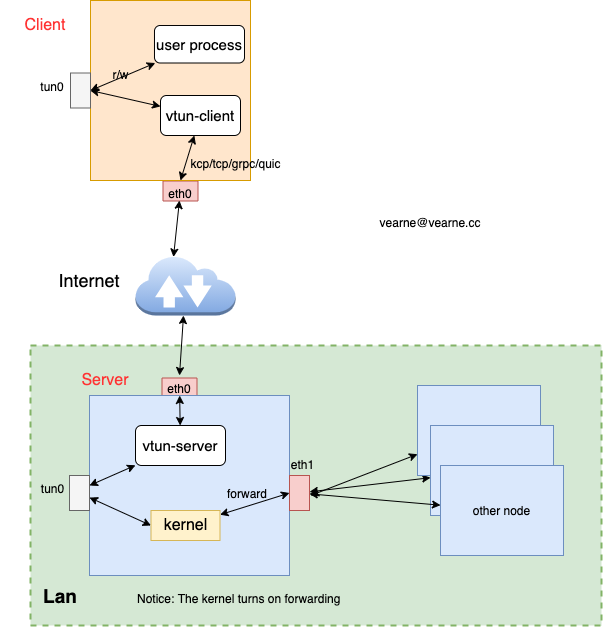
- vtun server通常暴露在公网中,这样客户端可以方便的接入
- vtun-client在Client上创建了虚拟网卡
tun0 - 在Client中的用户进程看来,它的流量都是发给
tun0,但是实际上它的流量都被vtun-client捕获,从eth0发给vtun-server - vtun-server所在Server开启了内核转发功能,因此可以转发给局域网中的其它实例
3.实验
我用青云的虚拟机构建了一个网络环境
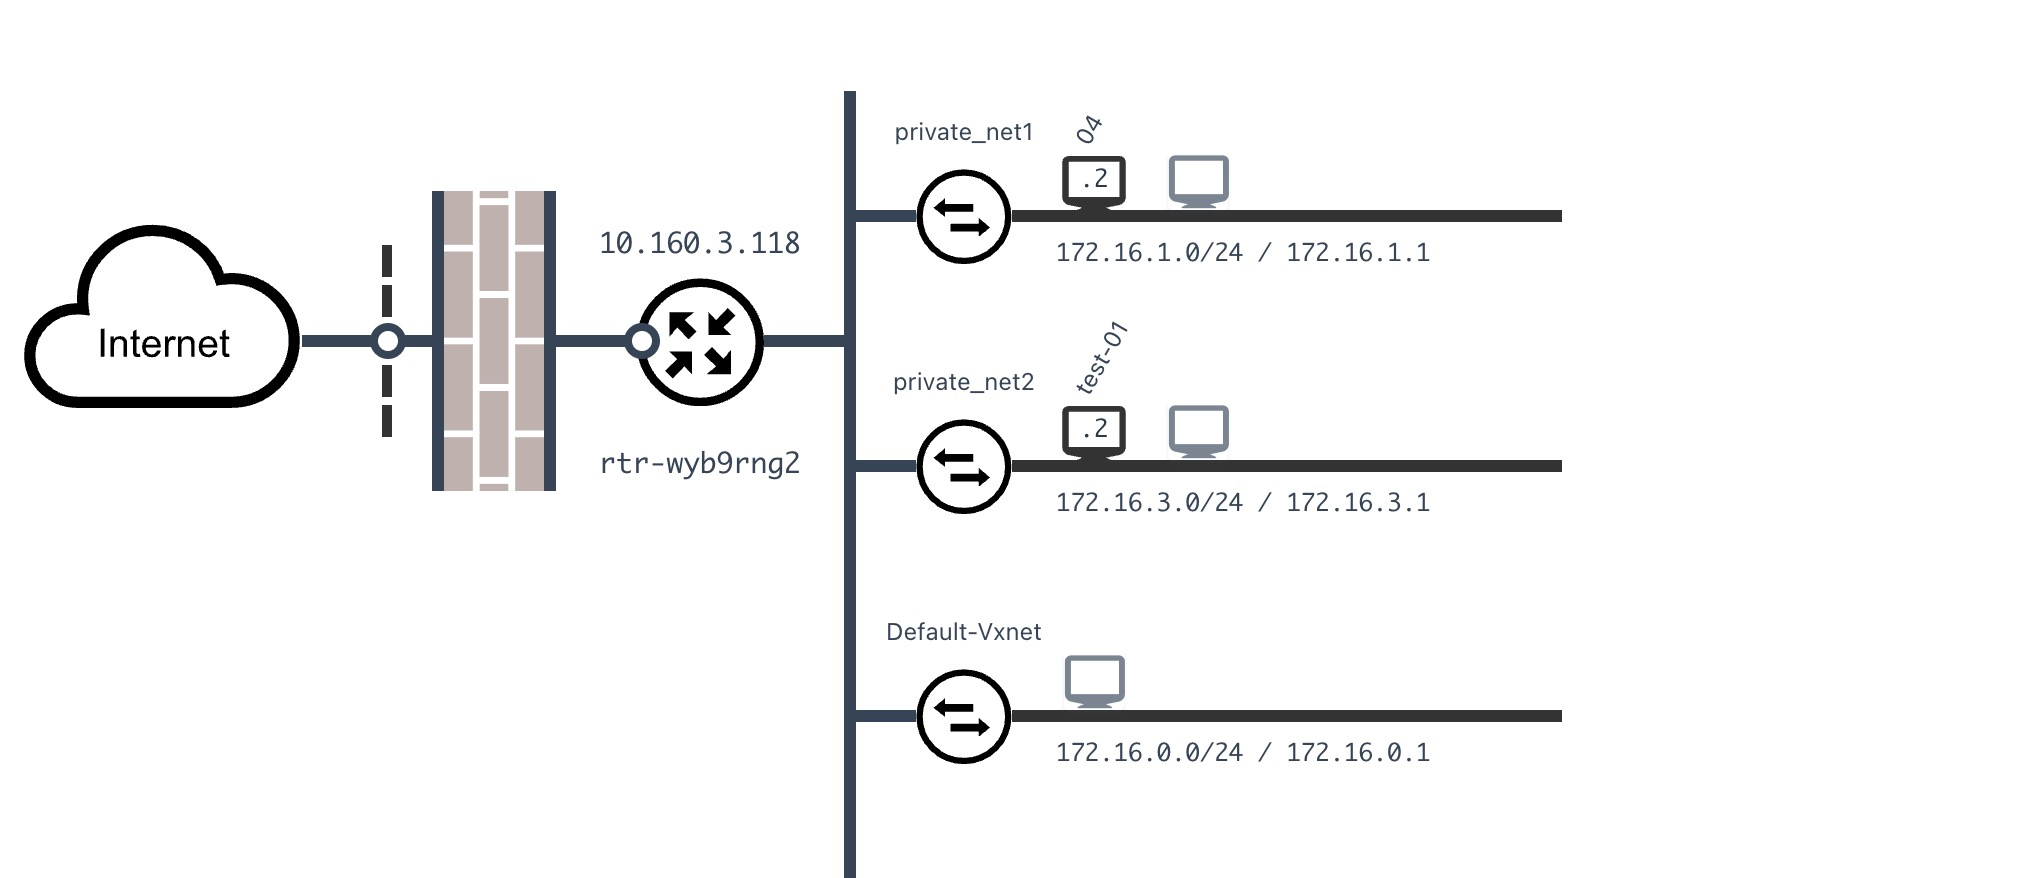
- vtun-server部署在青云的虚拟机上,IP地址为172.16.1.2, 测试机地址为172.16.3.2, 这2台机器位于2个不同的网段
- 测试机(IP: 172.16.3.2) 上部署了web服务,端口为8080
- vtun-client部署在腾讯云的虚拟机上(用vtun创建虚拟网卡,配置IP为172.16.5.10)
- 172.16.0.0/24、172.16.1.0/24和172.16.3.0/24 通过路由器连接在一起
验证方式
- 在腾讯云的虚拟机上,
ping青云的测试机(172.16.3.2) - 在腾讯云的虚拟机上,请求青云的测试机(172.16.3.2)上的web服务
3.1 部署
注意: 请自行修改密码
3.1.1 在Server上执行
1) 启动vtun server
nohup vtun-linux-amd64 -p tcp -S -l :27080 -c 172.16.5.1/24 -k {password} &
注意:萌叔这里使用的网段172.16.5.1/24 与之前的172.16.1.0/24和172.16.3.0/24均不在一个网段
server上创建了虚拟网卡
tun0: flags=4305<UP,POINTOPOINT,RUNNING,NOARP,MULTICAST>  mtu 1500
        inet 172.16.5.1  netmask 255.255.255.0  destination 172.16.5.1
        inet6 fced:9999::9999  prefixlen 64  scopeid 0x0<global>
        inet6 fe80::ab1f:1f20:fec5:78b  prefixlen 64  scopeid 0x20<link>
        unspec 00-00-00-00-00-00-00-00-00-00-00-00-00-00-00-00  txqueuelen 500  (未指定)
        RX packets 52  bytes 3162 (3.1 KB)
        RX errors 0  dropped 0  overruns 0  frame 0
        TX packets 33  bytes 3961 (3.9 KB)
        TX errors 0  dropped 0 overruns 0  carrier 0  collisions 0
这个虚拟网卡使用的驱动明显与其它网卡不同
# ethtool -i tun0
driver: tun
version: 1.6
firmware-version:
...
# ethtool -i eth0
driver: virtio_net
version: 1.0.0
firmware-version:
...
2) 开启内核的转发功能
  # Enable ipv4 and ipv6 forward
  vi /etc/sysctl.conf
  net.ipv4.ip_forward = 1
  net.ipv6.conf.all.forwarding=1
  sysctl -p /etc/sysctl.conf
  # Masquerade outgoing traffic
  iptables -t nat -A POSTROUTING -o eth0 -j MASQUERADE
  iptables -t nat -A POSTROUTING -o tun0 -j MASQUERADE
  # Allow return traffic
  iptables -A INPUT -i eth0 -m state --state RELATED,ESTABLISHED -j ACCEPT
  iptables -A INPUT -i tun0 -m state --state RELATED,ESTABLISHED -j ACCEPT
  # Forward everything
  iptables -A FORWARD -j ACCEPT
现在看看Server的路由表
root@i-bf77szgn:~# route -n
内核 IP 路由表
目标            网关            子网掩码        标志  跃点   引用  使用 接口
0.0.0.0         172.16.1.1      0.0.0.0         UG    100    0        0 eth0
172.16.1.0      0.0.0.0         255.255.255.0   U     0      0        0 eth0
172.16.1.1      0.0.0.0         255.255.255.255 UH    100    0        0 eth0
172.16.5.0      0.0.0.0         255.255.255.0   U     0      0        0 tun0
3.1.2 在Client上执行
nohup vtun-linux-amd64 -p tcp -s {公网IP}:27080 -c 172.16.5.10/16 -k {password} &
4. 结果
4.1 ping请求
#ping 172.16.3.2
PING 172.16.3.2 (172.16.3.2) 56(84) bytes of data.
64 bytes from 172.16.3.2: icmp_seq=1 ttl=61 time=45.5 ms
64 bytes from 172.16.3.2: icmp_seq=2 ttl=61 time=45.2 ms
64 bytes from 172.16.3.2: icmp_seq=3 ttl=61 time=45.0 ms
64 bytes from 172.16.3.2: icmp_seq=4 ttl=61 time=45.1 ms
^C
--- 172.16.3.2 ping statistics ---
4 packets transmitted, 4 received, 0% packet loss, time 3004ms
4.2 请求web服务
#curl http://172.16.3.2:8080/
<!DOCTYPE HTML PUBLIC "-//W3C//DTD HTML 4.01//EN" "http://www.w3.org/TR/html4/strict.dtd">
<html>
<head>
<meta http-equiv="Content-Type" content="text/html; charset=utf-8">
<title>Directory listing for /</title>
</head>
<body>
<h1>Directory listing for /</h1>
<hr>
<ul>
<li><a href=".bash_history">.bash_history</a></li>
<li><a href=".bashrc">.bashrc</a></li>
<li><a href=".cache/">.cache/</a></li>
...
结果表明vtun确实起到VPN的效果,打通了萌叔的青云和腾讯云的网络。
另外萌叔测试发现,vtun-client和vtun-server的通讯协议使用tcp/kcp均未发现问题。但是单纯的udp协议有问题。
初步推断可能与udp协议无法保证数据包的顺序有关。
参考资料